Hay muchos links azules encriptados a continuacion .
!Dale click a todos!
Te explicar todo el el contenido secreto que se encuentra en la DEEP WEB para manipular un Sistema de SDR por Software.
A Software Defined Radio (SDR) declaration to an agency, like the Federal Communications Commission (FCC), involves submitting documentation demonstrating the radio's compliance with regulations, particularly regarding software-related aspects. This includes a detailed description of the software, how it modifies radio frequency parameters, and how the software version is managed for verification purposes. The declaration ensures that the SDR, including its software, meets the necessary standards and can be operated safely and legally.
Here's a more detailed breakdown:
1. Purpose of the Declaration:
The declaration serves to prove to the agency that the SDR, including its software, complies with relevant regulations and standards.
This is especially crucial for SDRs that can be modified with new software, as it ensures continued compliance after any changes.
2. Key Components of the Declaration:
Software Description:
A comprehensive explanation of the SDR's software, including how it modifies RF parameters without hardware changes.
Software Security Process:
A description of the process the responsible party uses to ensure software security and regulatory compliance.
Software Version Management:
Details on how software versions are tracked and how users can verify the currently running version.
Intended Use:
A clear statement of the intended purpose and functionality of the SDR.
Compliance Statements:
Declarations that the SDR complies with specific directives and standards, like the RoHS directive.
Hardware and Software Declarations:
Manufacturers may choose to declare conformity for hardware and software separately or as a combined unit.
3. Regulatory Considerations:
FCC Certification:
The FCC requires specific procedures for SDR certification, often including testing in FCC labs.
Software Defined Radio (SDR) Defined:
SDRs are radios where some or all physical layer functions are implemented in software.
European Regulations:
European regulations also address SDRs, with organizations like ETSI providing guidance on compliance.
Thales, for example, provides SDRs that are compliant with NATO standards like SATURN and Link 22, and they also offer crypto devices for enhanced security.
La glaciación a través de datos meteorológicos en investigación de tecnología humanoide. Convierte una Estación Espacial Meteorològica en una amenaza para la vida a consecuencia de Catàstrofes Naturales sin ser advertidas en forma de guerra climática por las naciones.
La Guardia Civil está dedicada dentro y fuera del territorio español a proteger a las personas e intereses nacionales, lo que requiere establecer una forma de contactar rápida y directa con la Institución.
Esto se logra a través de las líneas telefónicas prioritarias y exclusivas para la comunicación de situaciones de emergencias, de las formas que a continuación se indican.
062
En el número 062, a través del cual la Guardia Civil le atenderá directamente, las 24 horas del día, los 365 días del año.
Una vez recibida la emergencia en ésta línea telefónica, por parte de la Guardia Civil se moviliza, tanto a personal de este Cuerpo, como a los recursos necesarios para la atención de su emergencia. Si usted no tiene claro si la emergencia es competencia de la Guardia Civil, póngase en contacto con nosotros que le atenderemos y, en su caso, comunicaremos la incidencia al cuerpo que tenga competencia sobre ella. En caso de peligro inminente para las personas o los bienes, puede pedir auxilio a la Guardia Civil, que aunque no esté dentro de sus competencias, le atenderá inmediatamente hasta que el cuerpo policial que deba actuar esté en condiciones de prestarle el auxilio pertinente.
En el número 112, siendo éste un número único de asistencia ante cualquier tipo de emergencia:
Sanitaria [ambulancia]. De extinción de incendios [bomberos]. Salvamento o seguridad ciudadana [Policía y Guardia Civil]. Tras la comunicación a esta línea de una emergencia, se moviliza y coordina de manera aislada o en conjunto, los recursos sanitarios, policiales (Cuerpo Nacional de Policía, Guardia Civil, Policías Autonómicas y Policía local), recursos de extinción de incendios, rescate y protección civil, con el fin de atender las distintas emergencias ocurridas y demandadas.
You can create all kinds of fun projects when you pair a Raspberry Pi with a low-cost USB Software Defined Radio (SDR). An SDR is essentially a radio wave receiver that can pick up signals from a variety of frequencies, including digital television, AM, FM, and DAB radio broadcasts, and weather satellite data.
This tutorial focuses on the information transmitted by the transponders installed on aircraft flying overhead using Automatic Dependent Surveillance – Broadcast (ADS-B). These avionic systems provide identity and altitude information to Air Traffic Control systems on the ground and Traffic Collision Avoidance Systems on other aircraft. Listen in for insight into a world we all take for granted.
As part of this tutorial, you’ll team up with other aviation enthusiasts and contribute to Flightradar24, who operate the world’s largest network of ADS-B/Mode S receivers. This network, together with government air traffic control and other data sources, tracks aircraft around the globe.
adapter to connect your microSD card with your usual computer
USB ADS-B receiver dongle
For the initial SD card setup, you will need:
Another computer connected to your network. We’ll refer to this as your usual computer to distinguish it from the Raspberry Pi computer you are setting up as a flight tracker.
Choose the right Raspberry Pi
This project will work on any Raspberry Pi Model 3 or newer. For this tutorial, we’ll use a Raspberry Pi 3 Model A+.
Choose the right ADS-B receiver
For the USB ADS-B receiver you can buy any RTL2832/R820T2-based USB dongle that’s available to you locally or from your favourite online retailer. Prices usually start around $20. This tutorial uses NESDR Mini (TV28T v2) USB RTL-SDR, DVB-T & ADS-B Receiver Set.
Install the Pi24 operating system
Download a pre-prepared Raspberry Pi operating system image from flightradar24.com by clicking on the blue "Download Pi24" button:
note
There are other ADS-B services that offer similar custom OS packages, e.g. FlightAware, ADS-B Exchange, and RadarBox, that will let you build an ADS-B ground station. We picked one here for the tutorial, but if you want to use one of the others, the procedure looks very similar. After installation you can also customise your installation to feed all of these services from a single Raspberry Pi.
During the OS customisation stage, edit settings as follows:
Enter a hostname of your choice (we suggest pi-flighttracker for this tutorial)
Enter a username and password; you’ll need these later to authenticate
Check the box next to Configure wireless LAN so your Pi can automatically connect to Wi-Fi
Enter your network SSID (name) and password; you can find these in your Wi-Fi settings or on a sticker on your router
Check the box next to Enable SSH so you can connect to the Pi without a mouse and keyboard
Remotely connect to your Raspberry Pi
SSH allows you to wirelessly connect to your Raspberry Pi, eliminating the need for a keyboard and mouse.
note
To SSH into the Raspberry Pi, you’ll use the hostname you set in Imager. If you have issues connecting using this method, you may want to use the Raspberry Pi’s IP address instead.
For more information about finding your IP address and remote accessing your Raspberry Pi, see the remote access documentation.
Connect via SSH
Open a terminal session on your usual computer. To access your Raspberry Pi via SSH, run the following command, replacing <username> with the username you chose in Imager:
$ssh<username>@pi-flighttracker.local
The first time you do this, confirm that you want to connect. When asked, use the password you created in Raspberry Pi Imager:
$ssh<username>@pi-flighttracker.local
The authenticity of host 'pi-flighttracker.local (fd81:b8a1:261d:1:acd4:610c:b069:ac16)' can't be established.
ED25519 key fingerprint is SHA256:s6aWAEe8xrbPmJzhctei7/gEQitO9mj2ilXigelBm04.
This key is not known by any other names
Are you sure you want to continue connecting (yes/no/
[fingerprint])? yes
Warning: Permanently added 'pi-flighttracker.local' (ED25519) to the list of known hosts.
The programs included with the Debian GNU/Linux system are free software;
the exact distribution terms for each program are described in the
individual files in /usr/share/doc/*/copyright.
Debian GNU/Linux comes with ABSOLUTELY NO WARRANTY, to the extent
permitted by applicable law.
Last login: Thu Oct 26 09:41:00 2023
<username>@pi-flighttracker:~ $
Now that you’ve connected to your Raspberry Pi, run two commands to make sure that all of your packages are up to date:
$sudoapt update
$sudoapt full-upgrade
Once the package update commands finish running, reboot your Raspberry Pi to allow all changes to take effect:
$sudoreboot
Running this command will disconnect you from the Raspberry Pi SSH session. Wait a few seconds for your Raspberry Pi to reboot, and enter the ssh connection command again to reconnect to your device.
tip
On most terminals, press the Up arrow key, then the Enter key to re-run the most recent command.
Set up Flightradar24
The first step is to create an account with Flightradar24 using your email address and a password of your choice:
Power down your Raspberry Pi.
Next, connect your USB ADS-B receiver dongle to a USB port on your Raspberry Pi. Connect the antenna by plugging it into the side of the dongle. You will feel a slight reassuring click when you attach it correctly:
Power up your Raspberry Pi once more. SSH back into your Raspberry Pi:
$ssh<username>@pi-flighttracker.local
To set up the flight tracker monitor, run the following command:
After a brief period of setup, a welcome screen and some instructions will appear, followed by the first in a series of configuration steps:
Welcome to the FR24 Decoder/Feeder sign up wizard!
Before you continue please make sure that:
1 - Your ADS-B receiver is connected to this computer or is accessible over network
2 - You know your antenna's latitude/longitude up to 4 decimal points and the altitude in feet
3 - You have a working email address that will be used to contact you
4 - fr24feed service is stopped. If not, please run: sudo systemctl stop fr24feed
To terminate - press Ctrl+C at any point
Step 1.1 - Enter your email address (username@domain.tld)
In order to continue, specify the location of your equipment.
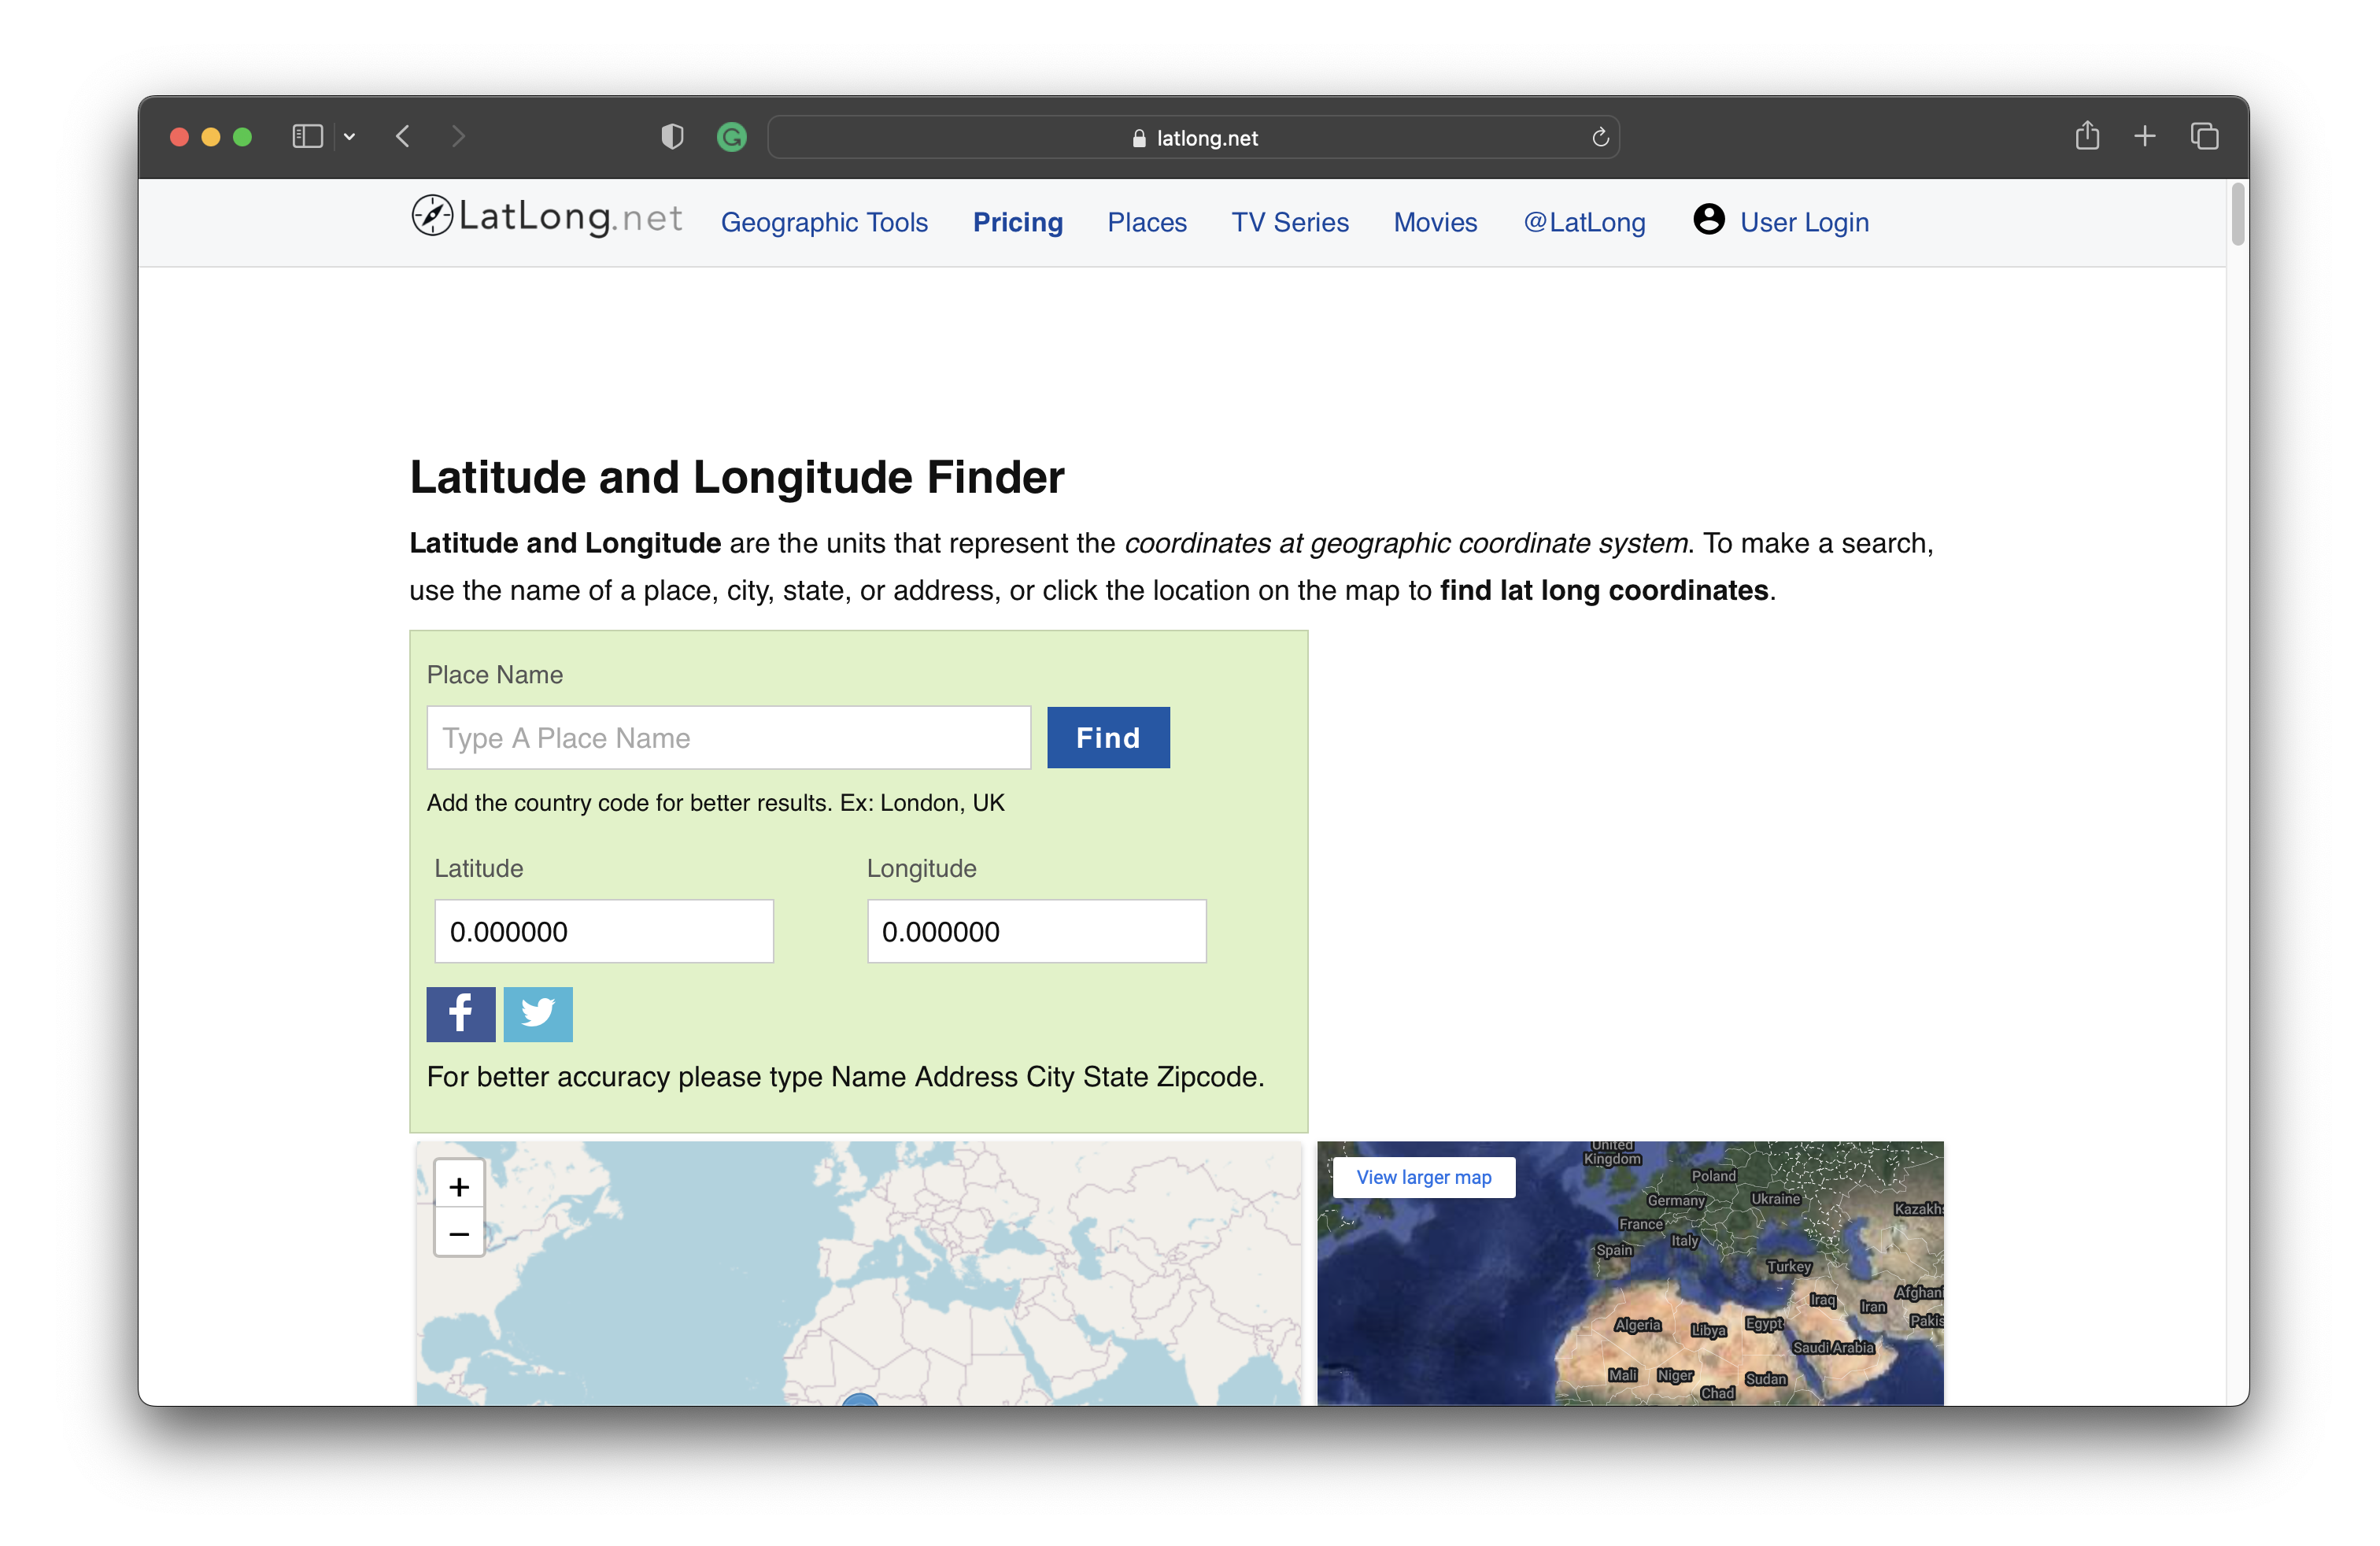
You can obtain your latitude and longitude coordinates from LatLong.net, either by searching for a place name or by navigating your way around the interactive map. Find your coordinates to four decimal places (for example, 52.2048, 0.1304 is close enough to get you to a cracking pub in Cambridge):
You can obtain your altitude from whataltitude.com. If you’re using this site for the first time, you might be prompted to enable location services for your browser to access your geographical position:
Now it’s time to finish the FR24 wizard. Enter the email address that you used to register your Flightradar24 account:
Step 1.2 - If you used to feed FR24 with ADS-B data before, enter your sharing key.
If you don't remember your sharing key, you can find it in your account on the website under "My data sharing".
Leave Step 1.2 blank, as we have not used the service before, and move on.
Step 1.3 - Would you like to participate in MLAT calculations? (yes/no)$:
MLAT, or multilateration, refers to the process of determining an aircraft’s position and heading by analysing the time difference between the arrival of radio signals from the aircraft. Since ADS-B transponders are not fitted on all aircraft, particularly older planes, Flightradar24 calculates aircraft positions using data from three or more other community receivers. For this tutorial we will participate, so we will answer yes to proceed.
Next, enter the latitude, longitude, and altitude details you just looked up:
Step 3.A - Enter antenna's latitude (DD.DDDD)
$:52.XXXX
Step 3.B - Enter antenna's longitude (DDD.DDDD)
$:0.XXXX
Step 3.C - Enter antenna's altitude above the sea level (in feet)
$:39
Using latitude: 52.XXXX, longitude: 0.XXXX, altitude: 39ft above sea level
Validating email/location information...OK
The closest airport found is ICAO:EGSC IATA:CBG near Cambridge.
Latitude: 52.205002
Longitude: 0.175000
Country: United Kingdom
Flightradar24 may, if needed, use your email address to contact you regarding your data feed.
Would you like to continue using these settings?
Enter your choice (yes/no)$:yes
The wizard will show the details for the nearest airport to you, followed by a final request to confirm your settings. Enter yes to continue.
Next, you need to confirm what type of receiver hardware you are using. In this tutorial we need to select 1 - DVBT Stick (USB):
Step 4.1 - Receiver selection (in order to run MLAT please use DVB-T stick with dump1090 utility bundled with fr24feed):
The remaining setup steps relate to more advanced functionality, so we’ll skip over them in order to get up and running with a basic setup.
In Step 4.3, you can provide additional dump1090 arguments describing how the data received by your device is processed. Leave this empty.
For Steps 5.1 and 5.2, which relate to exporting data from the device to another device or program, answer no.
Step 6 allows the creation of log files. Disable this by entering 0.
Enter your receiver type (1-7)$:1
Checking for dump1090...FOUND
Step 4.3 - Enter your additional dump1090 arguments or leave empty
$:
Step 5.1 - Would you like to enable RAW data feed on port 30002 (yes/no)$:no
Step 5.2 - Would you like to enable Basestation data feed on port 30003 (yes/no)$:no
Step 6 - Please select desired logfile mode:
0 - Disabled
1 - 48 hour, 24h rotation
2 - 72 hour, 24h rotation
Select logfile mode (0-2)$:0
Next, the wizard will submit your form data and register your device:
Submitting form data...OK
Congratulations! You are now registered and ready to share ADS-B data with Flightradar24.
+ Your sharing key (00013e5bf0d25b8d) has been configured and emailed to you for backup purposes.
+ Your radar id is T-EGTC8, please include it in all email communication with us.
+ Please make sure to start sharing data within one month from now as otherwise your ID/KEY will be deleted.
Thank you for supporting Flightradar24! We hope that you will enjoy our Premium services that will be available to you when you become an active feeder.
To start sending data now please execute:
sudo systemctl start fr24feed
Saving settings to /etc/fr24feed.ini...OK
Installation and configuration completed!
Congratulations, you now have a working flight tracker. Make a note of your sharing key and radar id.
View aircraft tracking data
The magic of this project is now happening behind the scenes: your receiver is now sending data. For now, just make sure your antenna is near a window with a view of the sky.
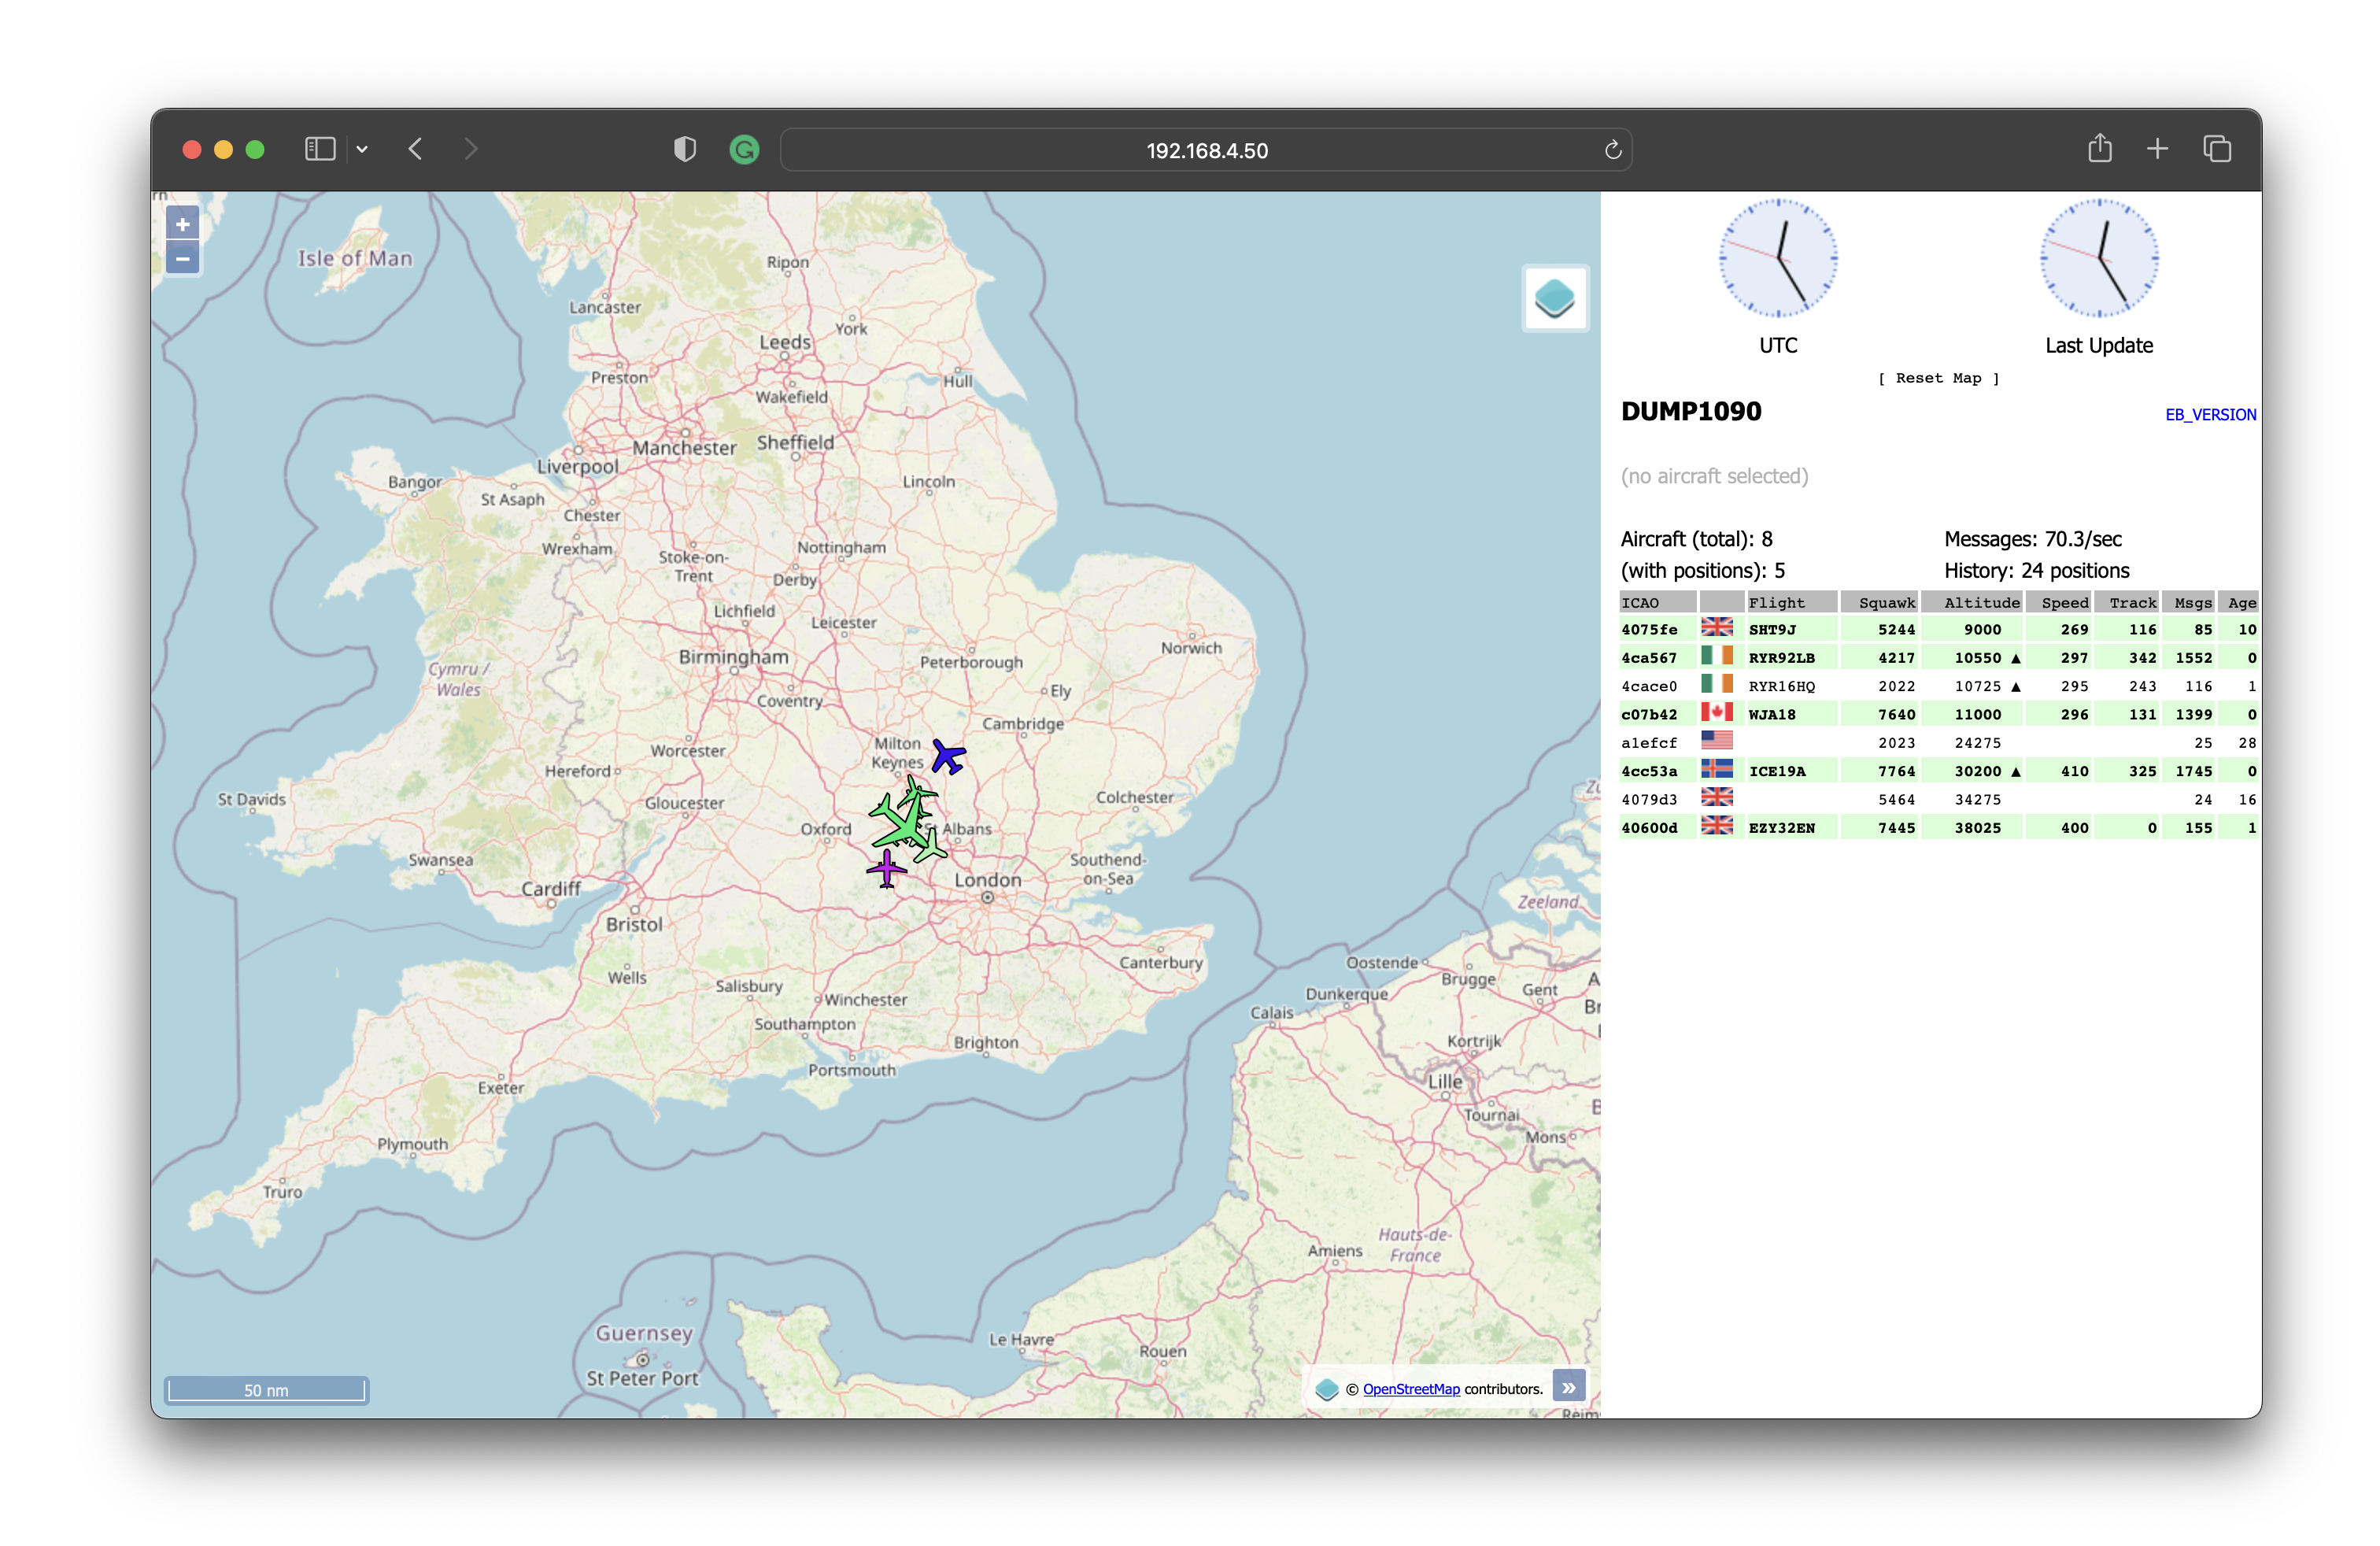
The Flightradar24 operating system image for Raspberry Pi has a very convenient built-in web server; that is to say, it will host a small web page on your local network for you to see all the information your flight tracker collects. To access this information, visit pi-flighttracker.local/dump1090/gmap.html.
Press Enter and you will see a live view of the data being collected. Click on individual aircraft for more information about each one:
So that’s what your device is currently doing. Visit flightradar24.com and log into your account to see information from all of the receivers in your area:
There’s a lot to take in here, so we are going to simplify things and display only the aircraft that your device is currently picking up. To do this, click on the Filters icon (circled above) at the bottom of your screen. This will bring up a window with the option to ADD FILTER. Use the slide bar to scroll down and select Radar:
Type in the radar id of your receiver — the one you made a note of earlier — into the box beneath the filter type:
Finally, click on the blue New filter button. The page should show fewer aircraft; these aircraft are the ones currently tracked by your receiver:
Try clicking on individual aircraft and digging into the information, including origin and destination details, type of aircraft, route taken, altitude, and much more. If it’s that time of year, keep an eye out for a certain bearded and red suit-wearing fella with his reindeer; he’ll be up there somewhere.
Onward and upward
To dive deeper, think about antenna placement for better reception. Try placing your antenna outside or in an elevated position to see how many more aircraft you can pick up.
Building on this project might take you on a journey to more complex systems with better antennas, or perhaps a solar-powered receiving station. The sky’s the limit!
…unless of course the sky isn’t your thing and you’re more interested in the sea, in which case you might want to look into receivers for Automatic Identification System transponders capable of listening to information about ocean-going vessels.
Hace 15 años era imposible seguir el vuelo de un familiar o un amigo desde la comodidad de su hogar.
Y hoy en día no habría sido posible si no fuera por los miles de voluntarios de todo el mundo
que comparten datos cruciales de vuelo ADS-B todos los días con empresas de seguimiento de vuelos como
AirNav para permitir el seguimiento de vuelos en tiempo real.
Compartir datos ayuda
Aumente la cobertura de seguimiento de vuelos locales y globales. Contribuya a hacer que los cielos de todo el mundo sean más seguros. Ayude a millones de personas a rastrear a sus familiares y amigos cuando vuelan.
Datos de seguimiento
36.564
Estaciones
190
Países partícipes
12.000+
Vuelos rastreados por día
Beneficios
1. Cuenta comercial gratuita
Sin anuncios
Capas meteorológicas avanzadas
ni tiempos de espera
Estadísticas de utilización y mapas de calor
Notificaciones push
Datos históricos de vuelos de 365 días
7 mapas diferentes
8 capas climáticas
2. Acceso a aplicaciones premium
Sin publicidad
Úselo tanto en Android como en iOS
Todas las funciones de la cuenta empresarial de AirNav
Disfrute de funciones exclusivas de la aplicación (por ejemplo, realidad aumentada)
3. Descuentos en hardware *
Filtros
Antenas (ADS-B, UAT, VHF)
Divisores
Adaptador USB AirNav (ADS-B, UAT, VHF)
Cables
4. Soporte prioritario
Soporte por correo electrónico 24 horas al día, 7 días a la semana
Asistencia para la configuración del receptor
Asistencia relacionada con la cuenta
Ayuda de la comunidad de Facebook Spotter
Solución de problemas
* Se anunciarán ofertas de descuento en hardware en
AirNavRadar.com de vez en cuando y solo podrán aprovecharse en la tienda
AirNav Radar de Amazon.
Clasificación mundial
Una vez que su receptor esté activo, podrá monitorear su clasificación en la página
NUEVAS UNIDADES y ver cómo se comporta su receptor entre otros alimentadores en nuestra página
La responsabilidad de quienes trabajan con NOTAM (Aviso a los Navegantes) es garantizar que la información crítica para la seguridad de los vuelos sea precisa, íntegra y se comunique correctamente. Esto implica alertar a pilotos y operadores aéreos sobre cambios, peligros y condiciones que afectan el vuelo, como cierres de pistas, problemas con las ayudas a la navegación, obstáculos o cambios en el espacio aéreo.
Responsabilidades clave
Publicación y exactitud: Asegurar que la información publicada en el NOTAM sea correcta, completa y basada en datos fiables. Un ejemplo es el rol de las oficinas de NOTAM, como la que gestiona CORPAC, que es responsable de la calidad de la información.
Comunicación crítica: Transmitir información vital sobre eventos y cambios para mantener a todos los actores de la aviación informados y seguros.
Cobertura de peligros: Alertar sobre cualquier peligro para la navegación aérea, incluyendo problemas meteorológicos excepcionales o erupciones volcánicas (mediante ASHTAM).
Alertas de aeródromo: Publicar NOTAM sobre condiciones de los aeropuertos, como cierres de pistas, problemas de mantenimiento o presencia de nieve/hielo (mediante SNOWTAM).
Gestión del espacio aéreo: Informar sobre modificaciones o limitaciones en el espacio aéreo, incluyendo zonas restringidas, peligrosas o prohibidas, y procedimientos de navegación aérea.
Coordinación operativa: Gestionar las solicitudes de publicación de NOTAM para actividades específicas, como eventos deportivos, y asegurar que se cumplan los procedimientos establecidos.
Implicaciones de los NOTAM
Para los pilotos: La consulta de los NOTAM es una parte obligatoria de la planificación de vuelos para garantizar la seguridad.
Para operadores de drones: Los NOTAM son esenciales para que los operadores de drones comprendan y apliquen la información relevante que afecta sus operaciones de vuelo.
Un NOTAM es un Aviso a los Aviadores (Notice to Airmen/Missions) que proporciona información esencial sobre cambios en el espacio aéreo, instalaciones o procedimientos que podrían afectar la seguridad de los vuelos. Estos avisos se transmiten por medios de telecomunicaciones y contienen información crucial, como cierres de pistas, fallas en sistemas de navegación o la presencia de peligros. Son esenciales para la planificación y ejecución segura de vuelos, ya sea para aeronaves tripuladas o drones.
Qué información contienen los NOTAM
Cambios en aeropuertos:Cierre o apertura de pistas por mantenimiento o por algún evento.
Instalaciones y servicios:Fallas en sistemas de navegación (como radioayudas) o cambios en procedimientos.
Peligros:Obstáculos, restricciones de vuelo, presencia de aves o drones, o ejercicios militares.
Por qué son importantes
Los NOTAM permiten a los pilotos y operadores estar al tanto de las condiciones temporales que pueden afectar la seguridad de su operación.
Antes de cada vuelo, las tripulaciones deben revisar los NOTAM para planificar sus rutas y maniobras de manera segura.
La falla en el sistema NOTAM de la FAA en 2023, que detuvo los vuelos en EE.UU., demostró su importancia crítica para las operaciones aéreas.
Quién emite y quién recibe los NOTAM
Son emitidos por las autoridades aeronáuticas de cada país.
Son recibidos por pilotos de aeronaves tripuladas y no tripuladas, así como por controladores y otros operadores aéreos.
+1 An ADS-B system for Raspberry Pi 4 uses a USB SDR ADS-B receiver, antenna cable, and an ethernet cable. The Raspberry Pi receives signals from the antenna, which are then processed to provide information about aircraft. Components Raspberry Pi: The Raspberry Pi 4 is a quad-core ARM Cortex-A72 processor with 802.11ac Wi-Fi, Bluetooth 5, and gigabit Ethernet. USB SDR ADS-B receiver: Captures signals from the antenna and monitors information such as altitude, position, velocity, and aircraft identification. Antenna cable: Connects the antenna to the USB SDR ADS-B dongle. Ethernet cable: Connects the Raspberry Pi to the internet. Setup Insert the SD card with PiAware installed into the Raspberry Pi. Plug the USB SDR ADS-B receiver into the Raspberry Pi. Plug the antenna cable into the USB SDR ADS-B dongle. Plug the ethernet cable into the Raspberry Pi. Plug the power into the Raspberry Pi. Benefits ADS-B is a surveillance technology that allows aircraft to communicate with each other and with ground stations. It's more efficient, faster, and smaller than traditional radar.


 Documentos compartido


%20Turismo.jpg)
Para mas información Contactar por privado al correo electrónico hernandotorojusto.htj@gmail.com
ResponderEliminarKeep On Working Real Hard Core
ResponderEliminarThe financial services is on LINE
EliminarVista creada con IA
ResponderEliminar+1
An ADS-B system for Raspberry Pi 4 uses a USB SDR ADS-B receiver, antenna cable, and an ethernet cable. The Raspberry Pi receives signals from the antenna, which are then processed to provide information about aircraft.
Components
Raspberry Pi: The Raspberry Pi 4 is a quad-core ARM Cortex-A72 processor with 802.11ac Wi-Fi, Bluetooth 5, and gigabit Ethernet.
USB SDR ADS-B receiver: Captures signals from the antenna and monitors information such as altitude, position, velocity, and aircraft identification.
Antenna cable: Connects the antenna to the USB SDR ADS-B dongle.
Ethernet cable: Connects the Raspberry Pi to the internet.
Setup
Insert the SD card with PiAware installed into the Raspberry Pi.
Plug the USB SDR ADS-B receiver into the Raspberry Pi.
Plug the antenna cable into the USB SDR ADS-B dongle.
Plug the ethernet cable into the Raspberry Pi.
Plug the power into the Raspberry Pi.
Benefits
ADS-B is a surveillance technology that allows aircraft to communicate with each other and with ground stations. It's more efficient, faster, and smaller than traditional radar.
https://47633919-e.blogspot.com/ LINK WEB Net Maneger T
ResponderEliminar